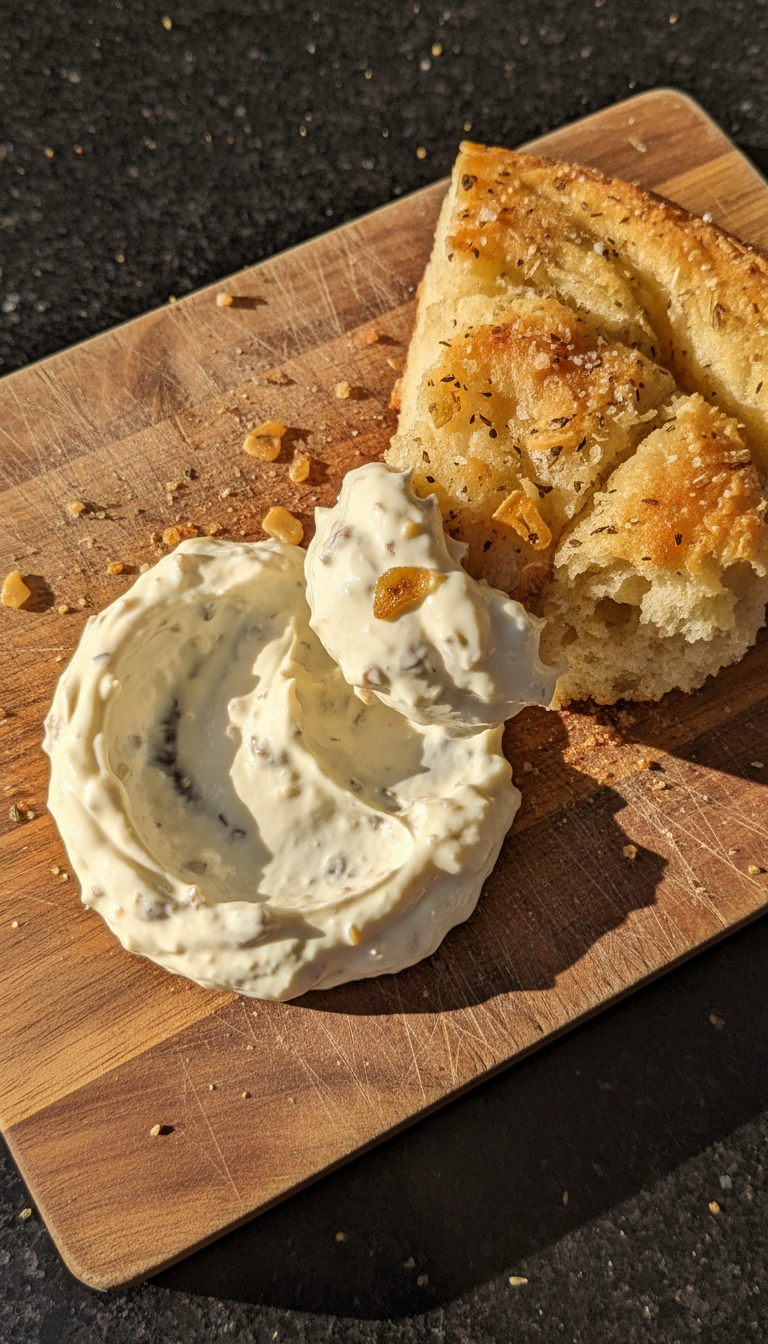
Roasted Garlic Aioli with Focaccia
Highlighted under: Global Flavor Recipes
I absolutely love making Roasted Garlic Aioli with Focaccia for gatherings because it’s a unique and delicious dip that surprises everyone. The smooth texture of the aioli pairs perfectly with the warm, soft focaccia, creating an irresistible combination. We host a lot of casual get-togethers, and I always have a jar of this aioli on hand, as it elevates even the simplest dish. You'll find that it's not just a dip, but a culinary experience that brings together bold garlic flavors with a hint of creaminess.
When I first tried making Roasted Garlic Aioli, I was surprised by how simple yet rewarding the process was. I usually roast garlic in olive oil, which brings out its sweetness and mellows the harshness, letting it blend seamlessly into the creamy mayonnaise base. This aioli has become a staple in my kitchen because of its versatility, complementing not just focaccia but veggies, chips, and even grilled meats.
Throughout my experiments, I discovered that the key to achieving that perfect creamy texture is to let the aioli sit for at least an hour after mixing. This resting time allows the flavors to meld beautifully, creating a rich and flavorful dip that everyone loves. Pair it with warm focaccia, and you've got a fantastic appetizer that will impress your guests!
Why You'll Love This Recipe
- Creamy and rich texture that enhances a variety of dishes.
- Garlic flavor that’s bold yet balanced, perfect for garlic lovers.
- Easy to make and great for gatherings or a cozy night in.
The Essential Role of Garlic
The key to a perfectly balanced roasted garlic aioli lies in the garlic itself. Roasting garlic transforms its sharp, pungent flavor into a creamy, slightly sweet essence that adds depth to the aioli. Aim for a head of garlic that is plump and firm; this ensures the cloves will roast evenly and yield well. If you find your garlic beginning to sprout, it’s still usable, but the flavor will be stronger. You want that buttery texture when pressed out of the skins.
When roasting garlic, keep an eye on it to ensure the cloves don’t burn, which can create a bitter taste. After around 30 minutes at 400°F, the cloves should feel soft and easily pierced with a fork. If they still feel firm after the time has passed, give them an additional 5–10 minutes. It's also worth noting that adding a sprinkle of salt to the foil packet can enhance the flavor during roasting.
Focaccia's Unique Character
The focaccia serves as the perfect vehicle for the aioli, offering a chewy texture that contrasts beautifully with the creamy dip. When preparing the dough, the mixing process should create a sticky texture, which is crucial for a light and airy focaccia. If it feels too dry, don't hesitate to add a bit more warm water, a tablespoon at a time. The hydration in your dough will ultimately lead to a more tender bread that rises beautifully in the oven.
Once you've shaped the focaccia, be sure to create deep dimples with your fingers. This not only creates visual appeal but also aids in holding the olive oil and sea salt, enhancing the flavor profile. Baking at 425°F allows for a lovely golden crust, so monitor it closely to prevent over-browning. The focaccia is done when it releases a lovely aroma and yields a hollow sound when tapped on the bottom.
Ingredients
For the Roasted Garlic Aioli
- 1 head of garlic
- 1/2 cup mayonnaise
- 2 tablespoons lemon juice
- 1 teaspoon Dijon mustard
- Salt and pepper to taste
- 1 tablespoon olive oil
For the Focaccia
- 2 cups all-purpose flour
- 1 teaspoon instant yeast
- 1 teaspoon salt
- 3/4 cup warm water
- 2 tablespoons olive oil
Instructions
Instructions
Follow these steps to make your roasted garlic aioli and focaccia.
Roast the Garlic
Preheat the oven to 400°F (200°C). Cut the top off the garlic head to expose the cloves. Drizzle with olive oil and wrap in foil. Roast for 30 minutes until soft. Let it cool, then squeeze out the roasted garlic cloves.
Make the Aioli
In a bowl, mix the mayonnaise, roasted garlic, lemon juice, Dijon mustard, and season with salt and pepper. Stir until smooth and combine thoroughly. Refrigerate for at least 1 hour.
Prepare the Focaccia Dough
In a large bowl, combine flour, instant yeast, and salt. Add warm water and 2 tablespoons of olive oil. Mix until it forms a sticky dough. Cover and let it rise for 1 hour.
Bake the Focaccia
Preheat the oven to 425°F (220°C). Pour dough onto a greased baking sheet, spreading it out gently. Create dimples using your fingers. Drizzle with olive oil and sprinkle with sea salt. Bake for 20 minutes until golden.
Serve and Enjoy
Slice the focaccia and serve warm with the roasted garlic aioli. Enjoy the delicious combination!
Enjoy this delightful dip with freshly baked focaccia!
Pro Tips
- For an extra flavor boost, try adding fresh herbs like rosemary or thyme to the focaccia dough before baking.
Storage and Make-Ahead Tips
Both aioli and focaccia can be made ahead of time, which makes them ideal for entertaining. The aioli can be stored in an airtight container in the refrigerator for up to a week—its flavors will deepen over time. Just give it a good stir before serving. If you want to preserve the freshness of the focaccia, wrap it in plastic wrap or aluminum foil and store at room temperature for no more than two days. For longer storage, consider freezing the focaccia; it can last up to three months when tightly wrapped and sealed.
To reheat frozen focaccia, preheat your oven to 375°F (190°C) and bake the bread directly from the freezer for about 10–15 minutes or until warmed through. This will restore the softness while regaining that delightful crustiness. Just be careful not to overheat it, or it may dry out.
Serving Suggestions and Variations
While the classic pairing of roasted garlic aioli with focaccia is delicious, consider experimenting with additional serving suggestions. Try adding fresh herbs like rosemary or thyme into the focaccia dough for an extra flavor burst, or present the aioli with a variety of fresh vegetables, such as bell peppers, carrots, and cucumbers, for a vibrant appetizer platter. For those who enjoy a spicy kick, consider mixing in a touch of sriracha or cayenne pepper to your aioli for a zesty twist.
If you’re feeling adventurous, variations of the focaccia can include toppings such as cherry tomatoes, olives, or caramelized onions before baking. These elements not only enhance the appearance but also contribute different textures and flavors that complement the garlic aioli beautifully.
Questions About Recipes
→ Can I use store-bought mayo instead of homemade?
Absolutely! Store-bought mayo works just as well for this recipe.
→ How can I store leftover aioli?
Store the aioli in an airtight container in the refrigerator for up to one week.
→ What can I use aioli with besides focaccia?
This aioli is delicious with vegetables, sandwiches, or as a dip for chips.
→ Can I make this aioli vegan?
Yes, you can use vegan mayo to make a vegan version of this roasted garlic aioli.
Roasted Garlic Aioli with Focaccia
Created by: The Cookcraftdaily Team
Recipe Type: Global Flavor Recipes
Skill Level: Beginner
Final Quantity: 4 servings
What You'll Need
For the Roasted Garlic Aioli
- 1 head of garlic
- 1/2 cup mayonnaise
- 2 tablespoons lemon juice
- 1 teaspoon Dijon mustard
- Salt and pepper to taste
- 1 tablespoon olive oil
For the Focaccia
- 2 cups all-purpose flour
- 1 teaspoon instant yeast
- 1 teaspoon salt
- 3/4 cup warm water
- 2 tablespoons olive oil
How-To Steps
Preheat the oven to 400°F (200°C). Cut the top off the garlic head to expose the cloves. Drizzle with olive oil and wrap in foil. Roast for 30 minutes until soft. Let it cool, then squeeze out the roasted garlic cloves.
In a bowl, mix the mayonnaise, roasted garlic, lemon juice, Dijon mustard, and season with salt and pepper. Stir until smooth and combine thoroughly. Refrigerate for at least 1 hour.
In a large bowl, combine flour, instant yeast, and salt. Add warm water and 2 tablespoons of olive oil. Mix until it forms a sticky dough. Cover and let it rise for 1 hour.
Preheat the oven to 425°F (220°C). Pour dough onto a greased baking sheet, spreading it out gently. Create dimples using your fingers. Drizzle with olive oil and sprinkle with sea salt. Bake for 20 minutes until golden.
Slice the focaccia and serve warm with the roasted garlic aioli. Enjoy the delicious combination!
Extra Tips
- For an extra flavor boost, try adding fresh herbs like rosemary or thyme to the focaccia dough before baking.
Nutritional Breakdown (Per Serving)
- Calories: 300 kcal
- Total Fat: 24g
- Saturated Fat: 3g
- Cholesterol: 10mg
- Sodium: 250mg
- Total Carbohydrates: 20g
- Dietary Fiber: 1g
- Sugars: 1g
- Protein: 3g